INSTALLATION VIDEO (eng)
INSTALLATION DATA SHEETS
>> download installation manual (eng, pdf) - Slate Lite
>> download installation manual (eng, pdf) - Eco Stone
>> download installation manual (eng, pdf) - Translucent Stone
>> download installation manual for facades (eng, pdf) - Slate Lite
INSTALLATION STEPS
INSTALLATION DATA SHEETS
>> download installation manual (eng, pdf) - Slate Lite
>> download installation manual (eng, pdf) - Eco Stone
>> download installation manual (eng, pdf) - Translucent Stone
>> download installation manual for facades (eng, pdf) - Slate Lite
INSTALLATION STEPS
|
1. Preperation
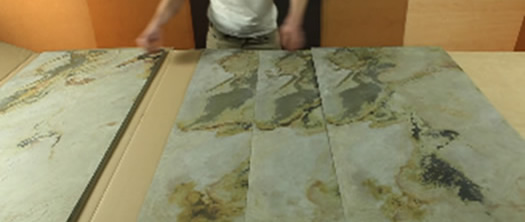
All sheets of Slate-Lite should be spread on a surface to check the vein of the material and be able to sort them to get a evenly distributed Wall or Floor application. |
| 2.
Protection
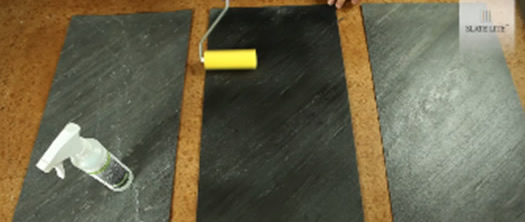
To Protect the Natural Stone Surface apply the impregnator with a spounge roller in a very thin layer. Let the material dry for 30 Minutes and then wipe off any access moisture to ensure no staining in the Material surface. This can be done before or after application. Material: Slate-Lite Special Impregnator/ Pearl Protection and Spounge Roller |
| 3. Adhering
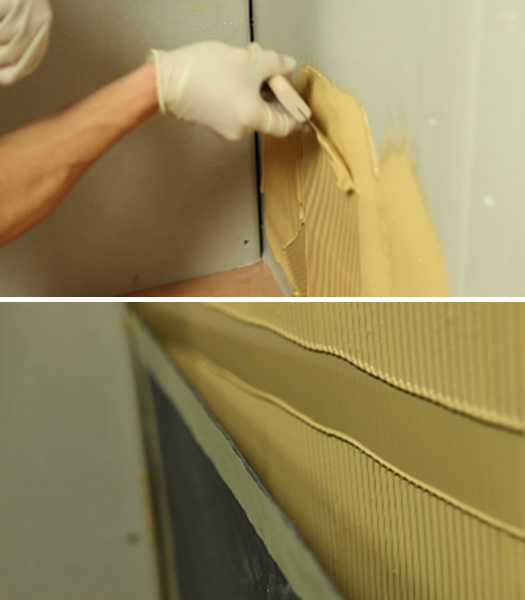
It is advisable to wear rubber gloves while working with Slate-Lite. For a full surface adhesion apply the adhesive to the back of the material or to the wall on which it shall be glued to with a B3 Seraded Scraper (Do not use a smooth scraper). Now apply the sheet to the required possition and slightly press it onto the glued surface evenly. To reach the best possible result: start on gound level and work from the bottom edge upwards or for flooring from on side to the other. If any adhesive has come out between the seems you can use the Slate-Lite Special Cleaner to rinse the same away. After 48 hours you can put full presure on the material. Material: Soudaseal HT Black, Soudal 240 FC Grey/ Black, Soudal Fix All Floor & Wall White, A Grey, Epoxyadhesive or other Polymer based adhesives. If required we can also assist in advising other possible adhesives. |
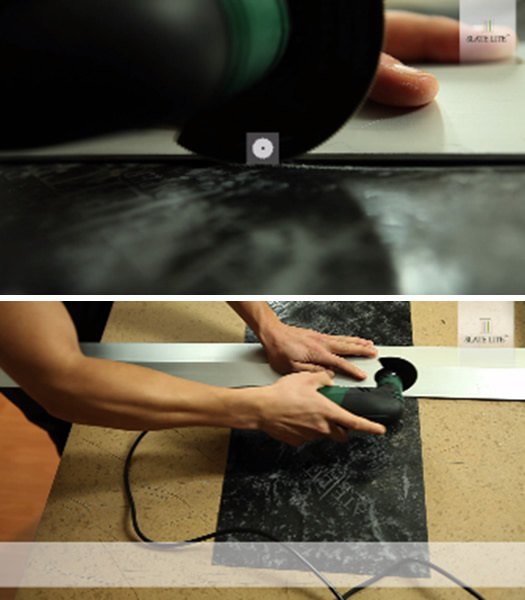
| 4. Cutting / Drilling The material can be cut and drilled with standard wood working materials. When cutting large amounts of material it is advisable to use diamond bladed tools. Material: Drill, Table Saw, Circular Handsaw, Jigsaw |
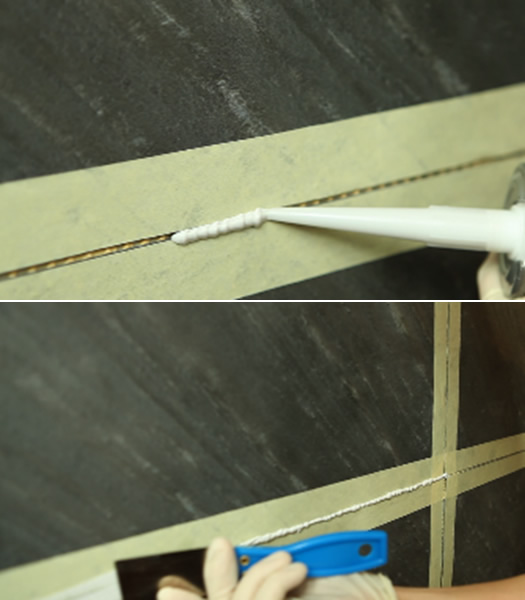
| 5.
Grouting
To make a grouting joint space should be left between the sheets (if necessary tile spacers can be used). The edges should be taped off with masking tape. After Taping the grouting can beginn with Natural Stone Silicon or Special Flexible Grout. Afterwards pull off the tape immediately before the grout is dry. Let the grout or silicon harden. Material: natural stone silicon, Slate-Lite Premium Grout, Tile spacers, Masking Tape |
| 6.
Corners
To create corners the sheets should be cut to the correct form in the first step. Afterwards both pieces should be layed together edge to edge and fixed with packing tape over the complete seem to ensure tensile presure when bending the edge. Add the adhesive to the seem from the back side of the material and to the full sheets. After applying the material to the required area, the adhesive must have time to harden. Once the adhesive has hardened pull off the tape and slightly sand over the edge with a fine sandpaper. Depending on the requirement the corner can also be applied edge on edge and then sanded to the correct extent. Material: Packing Tape, Sandpaper |
| Quick and Easy variation Apply the adhesive to the back of the sheet in snake lines. For this you require approx 5mm thick lines which can have up to 60mm distance to one another. The sheet can then be applied to the required surface. Due to the adhesive in not applied to the full surface, hollow areas will be behind the sheet. (Do not use this application method for flooring). |